
Thursday, September 20, 2012
Wednesday, September 19, 2012
"Popeye's" Pasta
Have you ever tried sweet italian chicken sausage? I hadn't until this recipe!
I get (almost) daily recipe updates from skinnytaste.com and this recipe for Baked Pasta with Sausage and Spinach came across in the beginning of the month. I just had to try it!
It turned out well and made a fairly large casserole. The dish did have an (in my opinion) overwhelming italian seasoning taste. My second eater also wasn't too impressed with the green spinach though I didn't mind it - he isn't impressed with any veggies. Actually, he cringes with "green things" in food. I have found that so many recipes these days are laden with veggies, which makes it sometimes hard to cook healthy for someone who really doesn't appreciate them.
Lessons Learned: Try LESS sausage as I think I had too much. I would also reduce (to make it less noticeable) or eliminate the spinach.
Ingredients:
1/2 cup grated Romano
8 oz fat-free ricotta
8 oz part-skim mozzarella, shredded
14 oz uncooked sweet Italian chicken sausage, removed from casing (I think I had more...)
12 oz WW rigatoni pasta
1 tsp olive oil
2 cloves smashed garlic, roughly chopped (I used a little diced garlic)
10 oz package frozen chopped spinach, thawed and squeezed of excess liquid
salt and fresh pepper to taste
4 cups Marinara Sauce
Directions:
1. Preheat oven to 375 degrees.
2. Spray 9 x13-inch baking dish with olive oil spray.
3. Bring a large pot water to a boil (salted)
4. In medium bowl, combine ricotta, 6 tablespoons of the Romano cheese and half of the mozzarella cheese. Set aside.

5. In a large (deep) skillet, brown sausage making sure to break it up into small pieces until cooked through.

Remove from skillet.
6. Add the oil to the skillet and sauté garlic about a minute.
7. Add spinach (if you are using) and season with salt and pepper; cook another minute.
8. Return the sausage to the skillet and add the marinara sauce; cook on low about 2-3 minutes.


9. Cook pasta according to directions for al dente, but undercook by 4 minutes. Drain and return to pot.
10. Put half of the cooked pasta into the baking dish and top with half of the meat sauce.

11. Spoon ricotta mixture over the sauce evenly.
12. Cover with remain pasta and sauce.
13. Top with rest of mozzarella and romano.
14. Cover with foil; bake for 20 minutes.
15. Remove foil; bake for an additional 5 minutes or until cheese is melted and edges are slightly browned.

Enjoy!
Tuesday, September 18, 2012
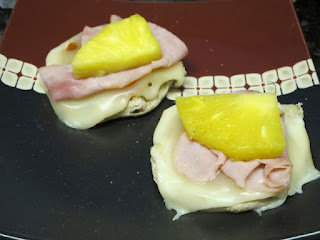
Mini Hawaiian Pizza
I love pizza! I have also found recently that I am a huge fan of pineapple so when I came across this Hungry Girl recipe for Pizza Luau - I was totally in!
The original recipe called for chopped ham and pineapple - oops - maybe next time! It was delicious anyway :)
Ingredients:
1 light English Muffin, split
2 tbs of low-fat marinara
1 stick of light string cheese (or low fat mozz measured out)
2 slices of shaved deli ham, chopped
1 pineapple ring (packed in juice), chopped
1 tbs chopped red onion
Directions:
1. Preheat oven to 350 degrees
2. Spread sauce onto each muffin half
3. Cover with cheese
4. Top with ham, pineapple, onion
5. Bake on baking sheet for 8-10 minutes

Monday, September 17, 2012
Swiss Chicken Casserole
Cheese, chicken and rice? How can it not taste good?
This casserole turned out well, though I could have eliminated the ham and would have enjoyed it just the same.
This recipe came from the Betty Crocker 300 Calorie Cookbook (p.87).
Ingredients:
4 cups boiling water
2 boxes (6oz each) florentine long grain & wild rice mix
4 large boneless skinless chicken breasts (~2 lbs)
8 slices of ham
1/4 cup diced bell pepper - any color (I used green)
4 slices swiss cheese, halved.
Directions:
1. Preheat oven to 350 degrees.
2. Spray glass baking dish (13x9) with cooking spray.
3. Combine boiling water, rice and seasoning mix in baking dish.
4. Cut chicken breasts in half (lengthwise) and wrap ham slice around each piece of chicken.
5. Stir bell pepper into rice mix.

6. Place wrapped chicken over rice.

7. Cover with foil; bake for 40-45 minutes.
8. Uncover, bake ~ 10 more minutes (or until liquid is absorbed and juice of chicken is clear).
9. Top each piece of chicken with cheese; bake uncovered 3-4 minutes (or until cheese is melted.

It comes out like this - yum!

Betty Crocker's Low Calorie Cookbook
I also have been looking through this cookbook from Betty Crocker.

It looks to have some good recipes with servings less than 300 cal. Like everything, it is hard to stick to the serving size so you still have to be careful.

It looks to have some good recipes with servings less than 300 cal. Like everything, it is hard to stick to the serving size so you still have to be careful.
Sunday, September 16, 2012
Skinny Shredded Buffalo Chicken
Putting my crock pot to use again, I made shredded buffalo chicken from skinnytaste.com.
This recipe is definitely a keeper! The original recipe provides details to make a buffalo lettuce wrap, however I just ate it plain as a snack (I couldn't help but pick at in my fridge!) or over lettuce. Surprisingly, it didn't taste too spicy but had a nice kick. If you are worried about the kick, it did seem to mellow the next day. The author of skinny taste recommended Frank's for the brand of hot sauce. It was fantastic - I definitely found a new favorite that has now made it's way to my eggs rather than the usual tabasco.

Ingredients:
24 oz boneless skinless chicken breast
1 celery stalk
1/2 onion, diced
1 clove garlic (I just did a little of fresh diced garlic)
16 oz fat free low sodium chicken broth
1/2 cup hot cayenne pepper sauce (Frank's was delicious! - though I definitely used more than the recipe called for).
Directions:
1. In a crock pot, combine chicken, onions, celery stalk, garlic and broth (enough to cover chicken, you can use water if the broth isn't enough). I cut the celery - oops!

2. Cover and cook on high 4 hours.
3. Remove the chicken from pot, reserve 1/2 - 1 cup broth and discard the rest.
4. Shred the chicken.

5. Return to the slow cooker with the 1/2 cup broth and the hot sauce and set to on high for an additional 30 minutes.

Served over salad with light bleu cheese dressing....

Saturday, September 15, 2012
Tortuga Rum Cake
Warning: If you are trying to eat healthy - don't try this recipe at home!
I have made this cake twice now with two different types of Tortuga Rum - it is absolutely mouth watering. This was one of the moistest cakes that I have ever made. Tortuga Rum is made in the Cayman Islands is somewhat difficult to get, however any type of Vanilly Hawaiian Rum will work.
The first time I made it I used a Tortuga Coffee Liquor, which gave a smooth coffee taste. The second time I made it, I wanted to compare the same cake made with different rums so I used the regular Tortuga Rum. They were both delicious but the regular tortuga rum had the definite rum cake taste compared to the smooth taste of the first.
The original recipe for the rum cake can be found at food.com.
Ingredients:
Basic Cake Mix
2 cups cake flour
1 1/2 cups granulated sugar
4 teaspoons baking powder
1 teaspoon salt
1/2 cup butter (softened, cut into bits)
3 tablespoons vegetable oil
For the Cake
1/2 cup finely chopped walnuts
1 (3 1/2 oz) package vanilla instant pudding mix (1 box)
1/2 cup milk (I used whole milk)
4 eggs
1/2 cup Tortuga Rum or substitute whaler vanilla rum (Hawaiian-style rum)
1/2 cup vegetable oil
1 teaspoon vanilla extract
Rum soaking Glaze
1/2 cup butter (do not substitute)
1/4 cup water
1 cup granulated sugar
1/2 cup Tortuga Rum or substitute

Directions:
Preheat oven to 325 degrees.
1. Make the Basic Cake Mix: In a large mixing bowl, combine basic cake mix ingredients.
2. On low speed combine ingredients until the mix is the consistency of fine gravel, and all particles are about the same size.
3. Make the Cake! Spray a large bundt pan with nonstick cooking spray (I used PAM Butter nonstick spray)
4. Sprinkle the chopped walnuts on the bottom of the pan.
5. Combine the basic cake mix with the pudding mix, eggs, rum, oil, and vanilla extract in a large bowl. Using mixer on medium speed, blend ingredients for 2-3 minutes (scrape bowl halfway through). The batter should be very smooth.
6. Pour into Bundt pan.

7. Bake for ~ 55 minutes until fully golden and tester comes out clean and cake springs back.
8. Remove from oven and place on cooling rack while make the soaking glaze. (To be clear, because I messed this up on the first one - it stays in the pan on the cooling rack).

9. To make the Rum Soaking glaze, combine butter, water, and sugar in small sauce pan.
10. Bring to boil (carefully - mixture boils over very easily!)
11. Reduce to simmer; cook until sugar is dissolved and syrup is combined. It should be a little thicker.
12. Remove from heat, add the rum. Mix to combine.
13. With cake still cooling, pour some of the rum syrup glaze onto the top of the cake, allowing time to soak in.

It may take a few minutes for all the syrup to absorb, but it will! Keep adding the syrup until all of it is in the bundt pan soaking.

14. Allow cake to cool completely before turning it out onto a serving platter.

The above picture was the one made the regular Tortuga Rum with the glaze soaked in. The picture below is the Rum cake made with the Torguga Coffee Liqueur. I didn't get a chance to snap a picture before we dove in!
The cake is fairly delicate, so once you turn it out of the bundt pan it can't be moved around easily.
Enjoy!! The cake tastes even better the next day :)
I have made this cake twice now with two different types of Tortuga Rum - it is absolutely mouth watering. This was one of the moistest cakes that I have ever made. Tortuga Rum is made in the Cayman Islands is somewhat difficult to get, however any type of Vanilly Hawaiian Rum will work.
The first time I made it I used a Tortuga Coffee Liquor, which gave a smooth coffee taste. The second time I made it, I wanted to compare the same cake made with different rums so I used the regular Tortuga Rum. They were both delicious but the regular tortuga rum had the definite rum cake taste compared to the smooth taste of the first.
The original recipe for the rum cake can be found at food.com.
Ingredients:
Basic Cake Mix
2 cups cake flour
1 1/2 cups granulated sugar
4 teaspoons baking powder
1 teaspoon salt
1/2 cup butter (softened, cut into bits)
3 tablespoons vegetable oil
For the Cake
1/2 cup finely chopped walnuts
1 (3 1/2 oz) package vanilla instant pudding mix (1 box)
1/2 cup milk (I used whole milk)
4 eggs
1/2 cup Tortuga Rum or substitute whaler vanilla rum (Hawaiian-style rum)
1/2 cup vegetable oil
1 teaspoon vanilla extract
Rum soaking Glaze
1/2 cup butter (do not substitute)
1/4 cup water
1 cup granulated sugar
1/2 cup Tortuga Rum or substitute

Directions:
Preheat oven to 325 degrees.
1. Make the Basic Cake Mix: In a large mixing bowl, combine basic cake mix ingredients.
2. On low speed combine ingredients until the mix is the consistency of fine gravel, and all particles are about the same size.
3. Make the Cake! Spray a large bundt pan with nonstick cooking spray (I used PAM Butter nonstick spray)
4. Sprinkle the chopped walnuts on the bottom of the pan.
5. Combine the basic cake mix with the pudding mix, eggs, rum, oil, and vanilla extract in a large bowl. Using mixer on medium speed, blend ingredients for 2-3 minutes (scrape bowl halfway through). The batter should be very smooth.
6. Pour into Bundt pan.

7. Bake for ~ 55 minutes until fully golden and tester comes out clean and cake springs back.
8. Remove from oven and place on cooling rack while make the soaking glaze. (To be clear, because I messed this up on the first one - it stays in the pan on the cooling rack).

9. To make the Rum Soaking glaze, combine butter, water, and sugar in small sauce pan.
10. Bring to boil (carefully - mixture boils over very easily!)
11. Reduce to simmer; cook until sugar is dissolved and syrup is combined. It should be a little thicker.
12. Remove from heat, add the rum. Mix to combine.
13. With cake still cooling, pour some of the rum syrup glaze onto the top of the cake, allowing time to soak in.

It may take a few minutes for all the syrup to absorb, but it will! Keep adding the syrup until all of it is in the bundt pan soaking.

14. Allow cake to cool completely before turning it out onto a serving platter.

The above picture was the one made the regular Tortuga Rum with the glaze soaked in. The picture below is the Rum cake made with the Torguga Coffee Liqueur. I didn't get a chance to snap a picture before we dove in!

The cake is fairly delicate, so once you turn it out of the bundt pan it can't be moved around easily.
Enjoy!! The cake tastes even better the next day :)
Subscribe to:
Posts (Atom)